DIY Pottery Barn Inspired Farmhouse Bed
Editor’s Note: I wrote a one year later post about how we like this bed and what we’d do different.
It’s amazing what you can accomplish with a little lumber and elbow grease.
I know I’m not the only one who pours over the Pottery Barn catalog looking for inspiration. I think I own a handful of actual Pottery Barn creations – a throw, a hook thingie (technical term there) and I’m sure there must be something else. However, I can’t seem to pull the trigger on any of the big stuff though – the sofas, the tables, the beds.
That’s where I owe a debt of gratitude to Ana White for coming up with the plans to make this bed and giving my husband and me the confidence to tackle this project.
The real Pottery Barn Farmhouse Bed is currently $1399. Ouch! Our bed cost less than a couple of hundred bucks with materials from Home Depot.
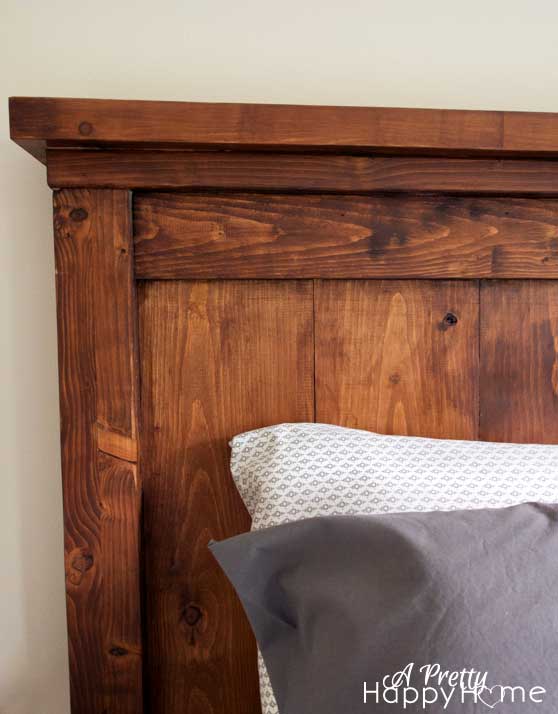
Is our bed a little different from the actual Pottery Barn version? Yep. There’s a detail on the side rail that is different. We also used vertical boards instead of one flat board in the headboard and footboard, which I think, gives it a more farmhouse look.
Do you see the posts on the headboard (above) and footboard (below)? Yep, those aren’t one-board posts. My husband couldn’t find perfectly straight 4×4 boards at Home Depot, so he fused two 2x4s together to create the posts. When he was finished with the glueing and sanding, you couldn’t even tell. I love it when he gets crafty!
This bed is made of ALL REAL WOOD. Do you know what that means? The sucker is heavy. Like, make me wish I was a weight-lifter heavy. And we carried it up the stairs in pieces! Who knew a 2×10 board could weigh so much? It’s safe to say this bed is going to last a good, long time. It makes me feel a little mushy inside knowing that the bed is something we created that can be passed down for generations to come.
Ahem, too much mushiness, let’s change the subject…
I love the imperfections in the wood. My husband bought the cheap wood at Home Depot and just sanded the heck out of it. I know it takes a little more time, but it’s amazing what you can create out of wood that other folks overlook. Plus, we have a really good sander.
The best part is when guests come to stay at our house, they have a real bed to sleep on instead of that futon from college. Kidding, there wasn’t any futon. There was the floor.
We are already planning what our next building project should be and that makes me very happy!
P.S. Most of the bedding came from Target. I made the artwork.
Here are some other posts you might enjoy!
Pottery Barn Farmhouse Bed – One Year Later
DIY Bench (Using the side rails from this Farmhouse Bed)
*affiliate links in this post*


10 Comments
Pingback:
Pingback:
Billie McClure
Loved your blog, the bed is awesome and the potting shed -mmm wish I had one in my back yard, but then I would have to work in the yard. Ok, I will be content with what I have. I have a recipe for Applesauce Oaties from your mom, she wrote it out for me years ago. It has been one of our favorites. Don’t know if you have the recipe or not, would love to send it to you. Message me your address if you would like it.
annisa
Thank you so much! I’m having fun with it all. I would love that recipe. I don’t think I remember eating those.
Kristina
We are currently tackling this bed and undecided on the stain. I love yours, though! It’s rich and warm. Would you mind sharing what brand/color stain you used?
annisa
Fun! I hope it is going well! We used Varathane brand stain & poly combined. It was the American Walnut color. However, the stain/poly combo is not as rich in color as what you might expect from a pure stain – I learned this during this project! So, after the first coat, I added a little bit of regular stain in American Walnut to the stain/poly combo. I just played with it until it was going on as dark as I wanted. You could add a regular walnut or even a kona color to darken the stain up. This was our first time using the stain/poly combo and I was expecting it to have more sheen than it actually ended up having. I hope this helps! Long answer to a short question!
Kristina
Shortly after posting, I saw your tips on staining and found the answer. 🙂 Thank you for the detailed info! It will all come in handy very soon!!
Pingback:
Pingback:
Pingback: