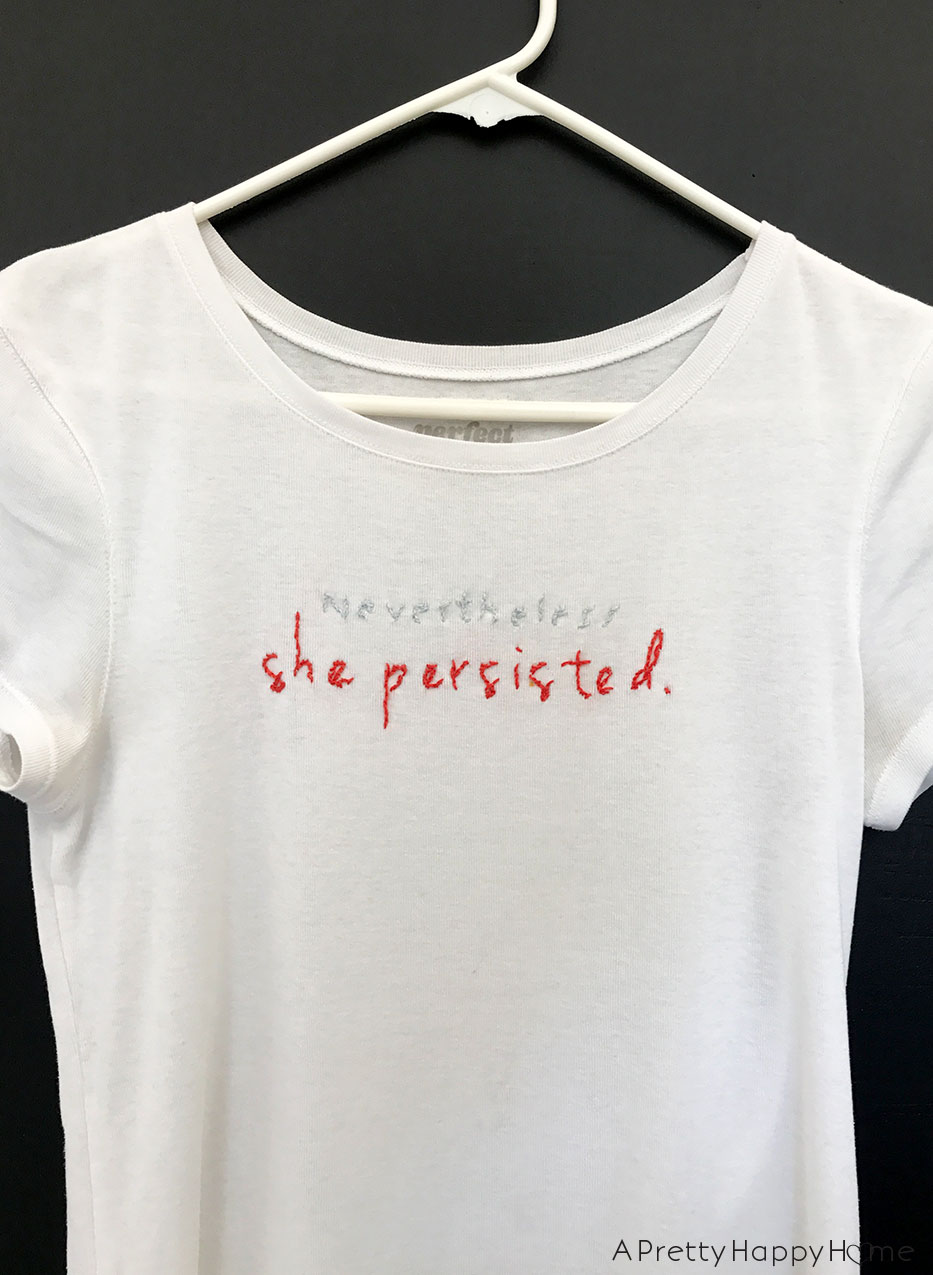
DIY Embroidered T-Shirt: Nevertheless She Persisted
I don’t usually do step-by-step tutorials because I’m not that detail-oriented, but I’m going to try my best today.
My main reason for this is because embroidery thread is right up there with felt on my list of favorite craft supplies! Also, to encourage you to try embellishing a t-shirt with embroidery stitching because it’s not as hard as you might think. I taught myself! If you can do it, the possibilities are endless.
Here’s the step-by-step of how I started with a plain white t-shirt and ended up with this result.

Step 1: Gather Your Supplies
You’ll need a t-shirt you want to embellish, embroidery thread, a sewing needle, backing material![]() (I used a water soluble one), scissors and an embroidery hoop
(I used a water soluble one), scissors and an embroidery hoop![]() .
.
The backing material![]() /stabilizer gives you something stiff to pull your stitches through. T-shirt material, even if pulled tightly, has too much “give” in it making it easy for your stitches to end up where you don’t want them. Don’t try this project without a stabilizer material of some sort.
/stabilizer gives you something stiff to pull your stitches through. T-shirt material, even if pulled tightly, has too much “give” in it making it easy for your stitches to end up where you don’t want them. Don’t try this project without a stabilizer material of some sort.
You’ll also need to print out a design you want to embroider, a pencil to trace on the design and a hard surface to work on while you do the tracing (I used a cutting board). Your design needs to fit on your shirt and simpler is better – at least at first. If you don’t want to reposition the design during the process, it also needs to fit inside your embroidery hoop.

Step 2: Trace your design
There are two ways to do this.
1) You can trace directly onto the shirt, like I did. This is because my shirt was white, so I could put the paper design underneath and still see through the fabric to where it was. You’ll want to work on a hard surface like a table for this, or like I did, use a cutting board slid inside the shirt.
2) You can also trace directly onto the backing material, which you would need to do if using an opaque-colored shirt. In that case, your shirt would be sandwiched between two pieces of backing material when do your stitching. Only do this if you are using dissolvable backing material though.

Start tracing with pencil. In this case, the pencil marks will be covered up with thread and/or the pencil marks will be washed away when you launder the shirt.
If you are tracing onto a dissolvable backing material, the backer will literally dissolve when you run it under cool water. It’s pretty awesome to watch!

Step 3: Secure shirt and backing material in the embroidery hoop.
This is how mine looked because I was only using backing material behind the shirt. It would be stiffer and easier to work with if there was also a second piece of backing material on top of the shirt.

Tighten the screw on the hoop and you’re ready to go.

Step 4: Prep your thread
A strand of embroidery thread is really 6 thin threads wound together. For this project, you don’t need all 6 strands. Separate the strands in half, so you are only working with 3 of the strands.

Because you aren’t using the thread in its super thick original form, you will only need a regular ‘sewing needle,’ not an ’embroidery needle.’ The eye of the needle does need to be wide enough to thread 3 strands through though.
I’ve also found that the sharp point of a regular sewing needle is handy for this project since you’re stitching through the t-shirt fabric and one or two layers of backing material.

Step 5: Start stitching
For a really good tutorial on the types of hand embroidery stitches, read this Craftsy article. It’s how I taught myself. I used a split stitch for this particular design.
If you are stitching letters, like I was, then start your stitches much how you would start writing each letter. That way, you minimize the amount of back tracking or doubling up on stitching.
Note of caution if you are using a white shirt. If the shirt is a little see through then you don’t want to make a mess of your thread behind the scenes. For this particular design, I had to tie off the thread for every single letter since the font wasn’t connecting cursive. It made the process go a lot slower. If you’re using a dark colored shirt, this won’t be as big of an issue.

Step 6: Enjoy your creation
When finished, you’ll want to dissolve the backing material under water if you are using a water soluble backer. Then launder as usual.
If you are using a backer that does not dissolve, you’ll just want to trim it down and you can wear your shirt!

I probably spent two Netflix shows on this project – or 1.5 – 2 hours. I’m always happy when I can turn a little Netflix binge into a productive crafting session! I’ve washed this shirt a couple of times since I made it in March and the stitching has held up great! I hope you give it a try. Let me know what questions you have…in other words, what details I left out!
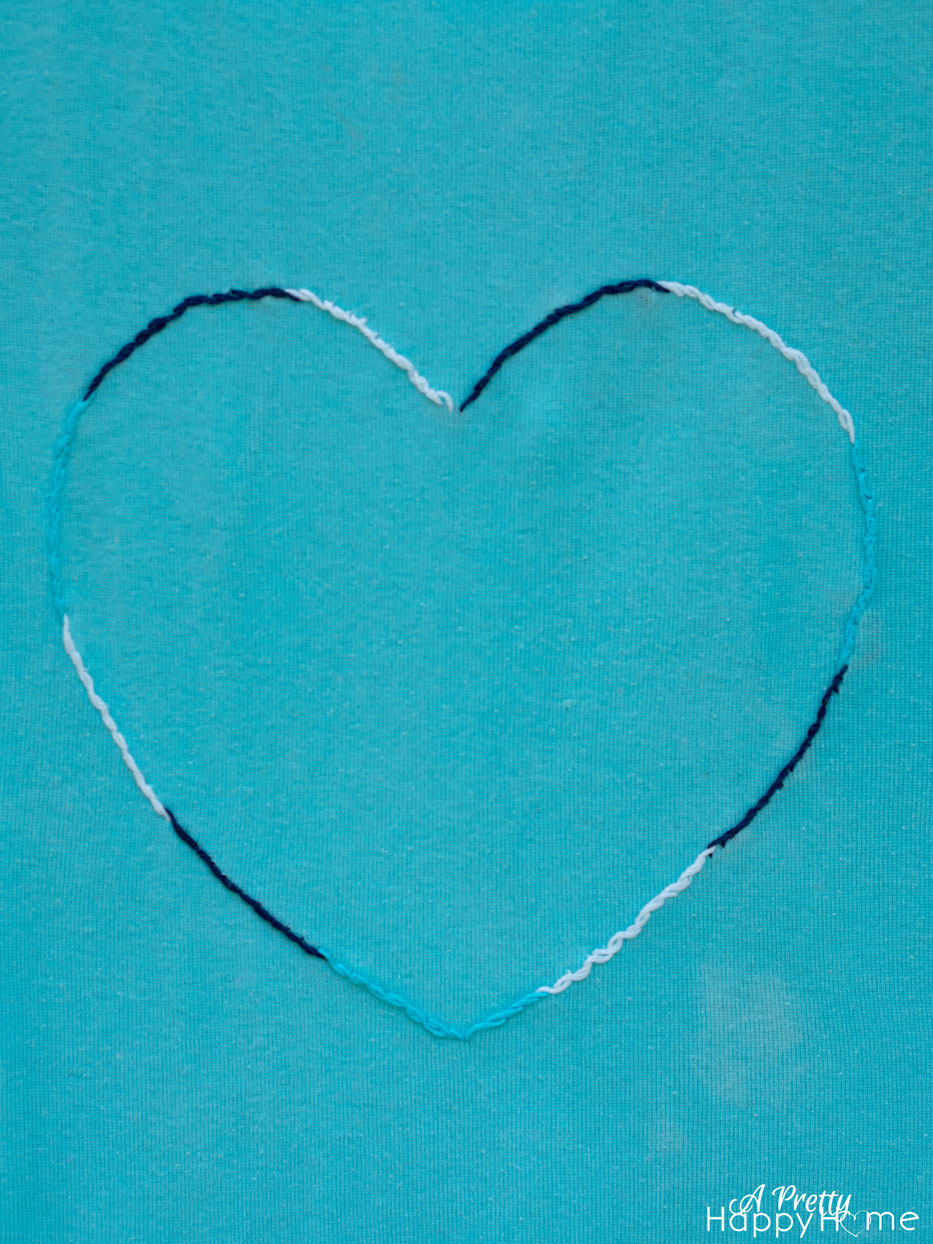
P.S. This isn’t my first trip down the embroidery stitching lane.
I also worked some embroidery thread magic on a tank top and some jeans.
Happy stitching!
*Affiliate links contained in this post.*


5 Comments
Dawn Olsson
I like it!
annisa
Thanks! And welcome home!
Pingback:
Pingback:
Pingback: