
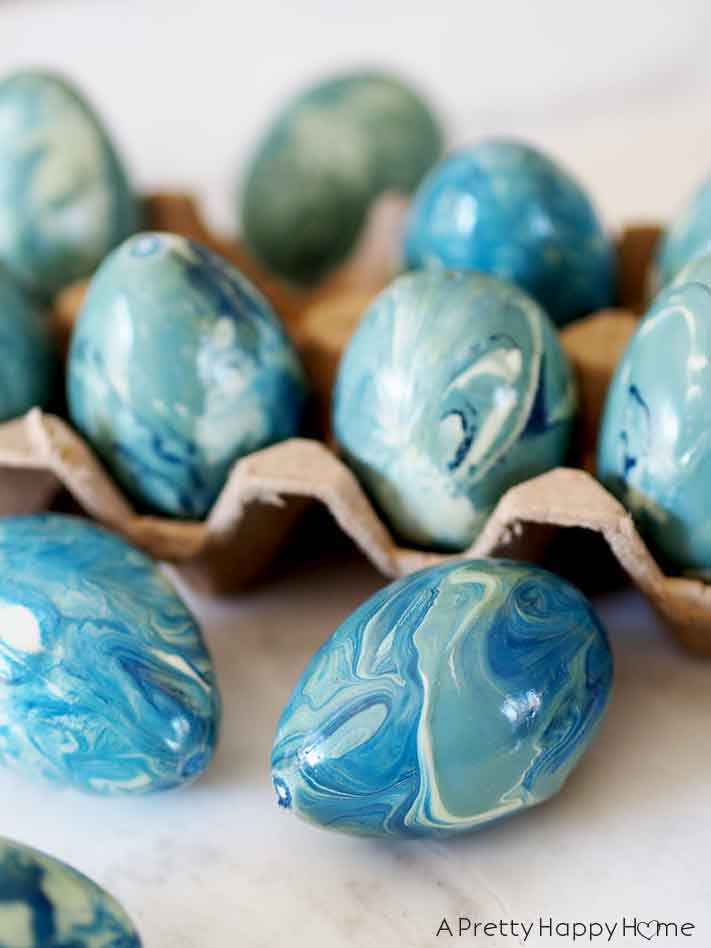
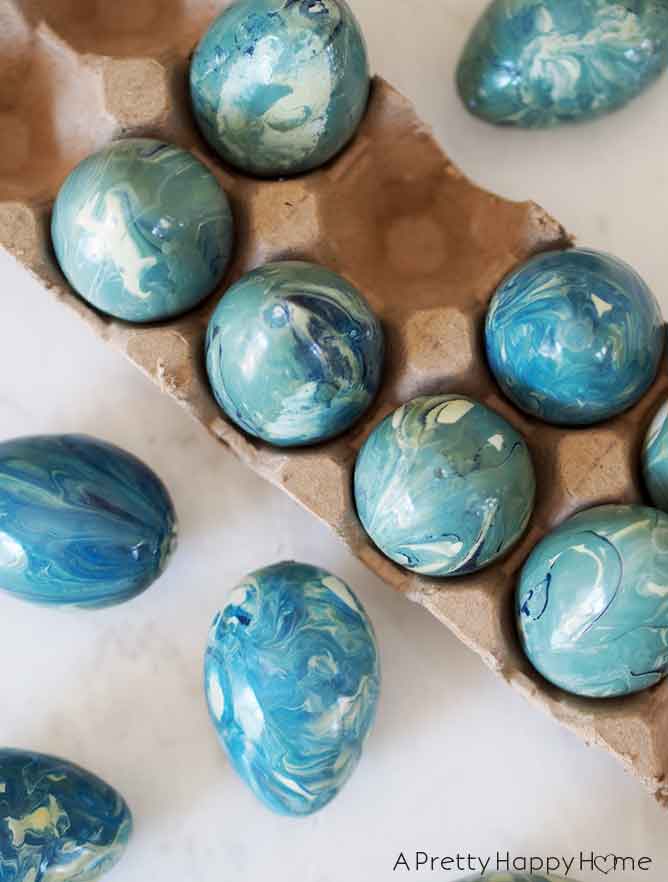
Marbled Faux Easter Eggs
Have you ever jumped off something high and the instant you jumped you regretted your decision?
Sticking the landing might be the best outcome, but who are we kidding? You’re just trying not to go splat.
That’s me and this marbled faux Easter egg project.
And also me when I jump off anything. Which is why I don’t jump off anything.
I started this project because I wanted to create a marbled paint effect on something. Anything. I had some fake Easter eggs sitting in the closet mocking me while I tried to come up with a way to decorate them, so I thought, “Why not try marbling those Easter eggs?”
This is the inherent danger of working alone. When you ask a question, there is no one to answer back with words of caution.
If only ‘Future Me’ could have told ‘Past Me’ what I was getting into, here are some things I could have learned. Maybe you’ll find them as useful as ‘Past Me’ would have…not that she always listens.
#1: Marbling wastes a lot of paint! And how do you dry a painted egg?
I didn’t realize just how much paint it would waste and this was painful for me.
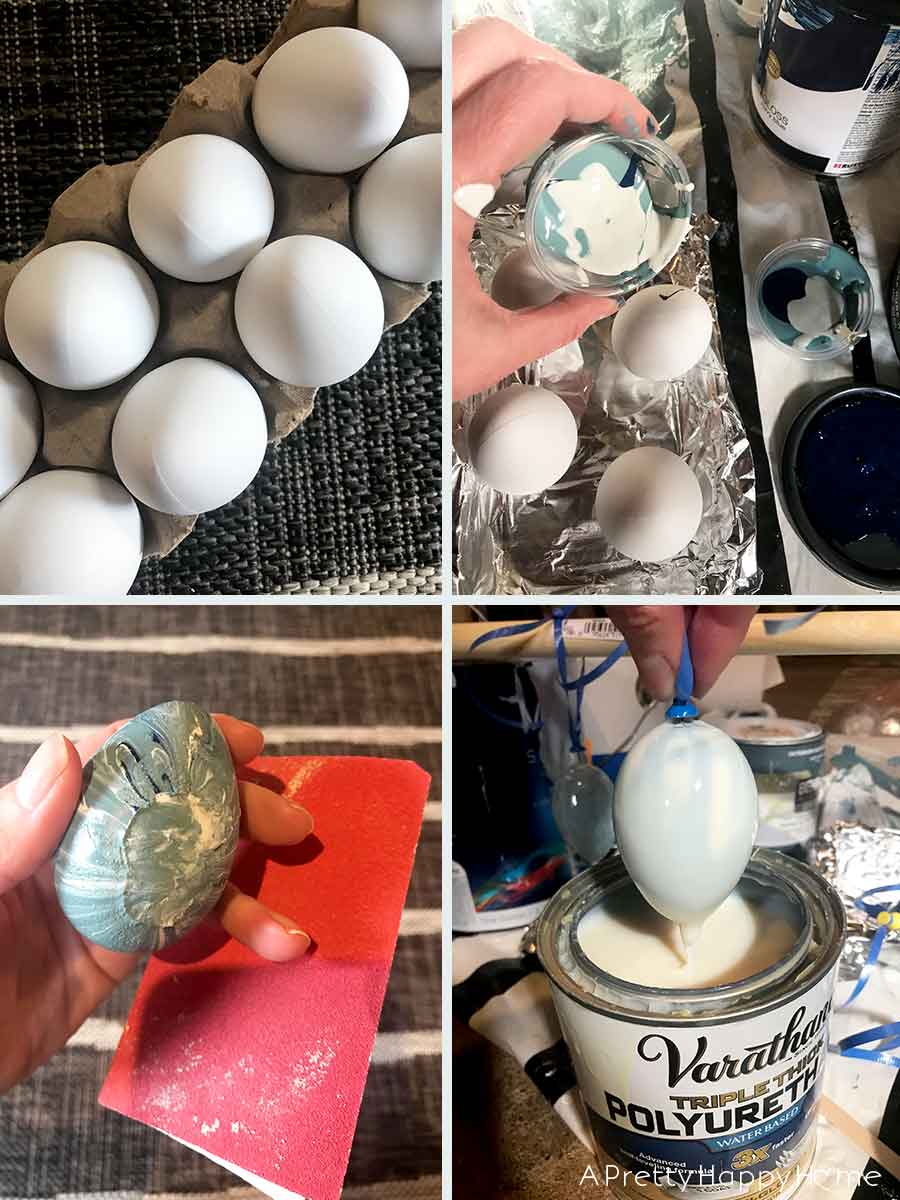
I tried two different painting techniques. The first technique was to pour one paint color into a shallow bowl then drizzle on at least two different colors of paint on top of my primary color. Then my idea was to roll the egg around in the paint and out it would come all marbled and beautiful.
HA!
The problem is once you roll the egg in the paint, the paint colors blend together. So you almost need new paint for every egg. Then you have to get your egg out of the paint. This can be messy. You also have to have a place to dry your egg without ruining the marbling effect.
Do you see why this became a nightmare for me?
I tried hot glueing a popsicle stick onto the end of the egg to give me a handle so that I wasn’t touching the egg itself. This worked okay. But, it still presented a problem when it came to drying the egg.
I also tried wearing disposable gloves and using my fingers to roll the egg around in the paint. This plan of attack gave me no fewer than nine new grey hairs.
The second painting technique involved me layering the paint into a tiny disposable container. Then I hot glued the eggs to an aluminum foil-covered produce container so that they were standing upright-ish. I tried to use as little glue as possible. Then I poured the paint directly over the upright-ish eggs. The biggest problem with this technique (I don’t need to mention them all) is the glue on the bottom of the egg. After some trial and error (lots of error) I ended up using a little bit of sandpaper to remove the most obvious glue remnants.
If the egg fell over while it was drying (and it did), then I also used sandpaper to smooth out any paint ridges created by that fiasco.
#2: I’m a glutton for punishment and decided to make my eggs shiny.
It was at this point in the project that I could have scrapped it all and been done. Lesson learned.
However, I’m the person who says, “Maybe I can salvage this project.”
I’m also the person with nine new grey hairs who thinks she can stick the landing after jumping, so maybe you should question my judgment.
I tried brushing clear polyurethane on the eggs, but I still had all the same problems with drying them.
And then inspiration struck.
I decided to see if I could stick a thumbtack in one end of the egg and then I could hang the eggs to dry. See? I was learning. Refining my techniques. This project was looking up!
The faux eggs I used were made of a hard plastic and were hollow. The thumbtack went in on most of the eggs. It did break a bigger hole in 3 or 4 of the eggs. I didn’t give up though! For those eggs, I stuck a nail in the hole. Then I tied a piece of ribbon to the nail or thumbtack and hung the eggs to dry from a dowel. This worked surprisingly well and I wish I had used this technique from the get-go.
The most satisfying part of this entire project was that I just dipped the entire egg in the can of polyurethane. I cannot tell you how enjoyable it was to dunk the eggs. I let most of the excess polyurethane drip back into the can before I hung the eggs up to dry.
Yes, this wastes A LOT of of polyurethane, but did I mention how satisfying it was?
There’s just one little thing about this drying technique that you need to know. I thought all the poly would drip off and the eggs would perfectly dry. Nope. One drip dried hard at the end of the eggs.
It looked like the egg had a nipple. The one thing an Easter egg should not have is a nipple. The one thing this blog should not discuss is nipples.
*insert forehead slap here*
I should have seen that problem coming because in hindsight it makes sense. To solve THAT problem, I gently sanded the drip off. (Notice I’m not using that OTHER word anymore.) It sort of worked.
#3. I didn’t go full on SPLAT with these marbled faux Easter eggs, but some projects are best appreciated from a distance.
As long as you don’t look too closely at the painted Easter eggs, they look really bright and happy. Even Handy Husband commented that they looked pretty. However, in the next breath he asked me if we had to eat them, which made me question the sincerity of his compliment…and his observation skills.
I guarantee if you pick up one of the painted eggs you’ll be able to see that they are fake and exactly how I struggled through this process. Now that I’ve pointed out the flaws, you can probably find them in the pictures too.
If I hadn’t mentioned any of that you might have assumed these were pretty, painted Easter eggs and that I know exactly what I’m doing.
Hahahahaha.
I could have spun it that way, but I don’t want you to have the impression that things are picture-perfect around here. They aren’t, but rest assured, I don’t take myself or these project foibles too seriously! And, hey! Maybe someone else can learn from my mistakes. Maybe you have an idea on how I could execute on this idea better. If so, do share!
Sometimes I think curiosity is a 4-letter word that someone misspelled, but most of the time my curiosity keeps me engaged and always learning. Plus, think of all the stories I have to tell!
P.S. I just asked myself if I should try painting another batch of marbled faux Easter Eggs since I “think” I have the kinks worked out of the system. The marbled effect really is so pretty! Future Me is screaming a response, but I can’t really make out what she’s saying…
P.P.S. The faux eggs were from Michael’s in their seasonal section. The polyurethane is from Home Depot. The triple thick poly is tricky to work with unless you are just dunking eggs in the can, which is why I was okay with using this can of poly for this particular project.
Here are some other Easter Egg projects you might enjoy!
Easter Egg Painting (throw it at a canvas!)
*affiliate links in this post*


4 Comments
Sandy Smith
This was a great bog. It made me laugh but I also learned some things. The eggs are beautiful. I admire your sticking to it and not giving up because the results are great. You’ll be able to use these eggs in years to come.
I have to admit I would have given up and dumped it all out after the first attempt. I love your perseverance because you come up with some beautiful items.
I’m looking forward to your next creative project.
Sandy
annisa
Thank you! I just finished and photographed one today. HURRAY!
Dawn Olsson
Ok, I have to tell you, I chuckled through some of this blog. Or “bog” as Sandy called it, which might fit this project better. They do look pretty after all that. I hope they last longer than just this year after all that!
annisa
Oh, they will last! No doubt about that. The triple-thick poly took care of that. I am trying to create things that last because, hello, the effort! And I tried to use colors that work with my decor. But they also hold some negative memories. LOL!!!