
The Most Satisfying Staircase Makeover You’ve Seen Today
There has been a major oversight on this blog documenting the fixer-upper projects of this money pit Colonial Farmhouse. I never shared the staircase makeover of our main stairs.
Can you believe that?
Me. A chronic over-sharer forgot to tell you about one of my projects in excruciating detail.
You had one job, Annisa. One. Job.
How is this even possible?
Well, it’s possible (cue the justification) because I lumped the staircase makeover in with the music room makeover when I wrote about it two years ago.
But that post just glossed over the details.
You need the details to appreciate what will be the most satisfying staircase makeover you’ve seen today…or maybe in the next two minutes. I don’t want to set the bar too high.
Technically, I think this might be a staircase make-under because all I really did was strip away the visual bonanza so that you could see the staircase’s simple beauty.
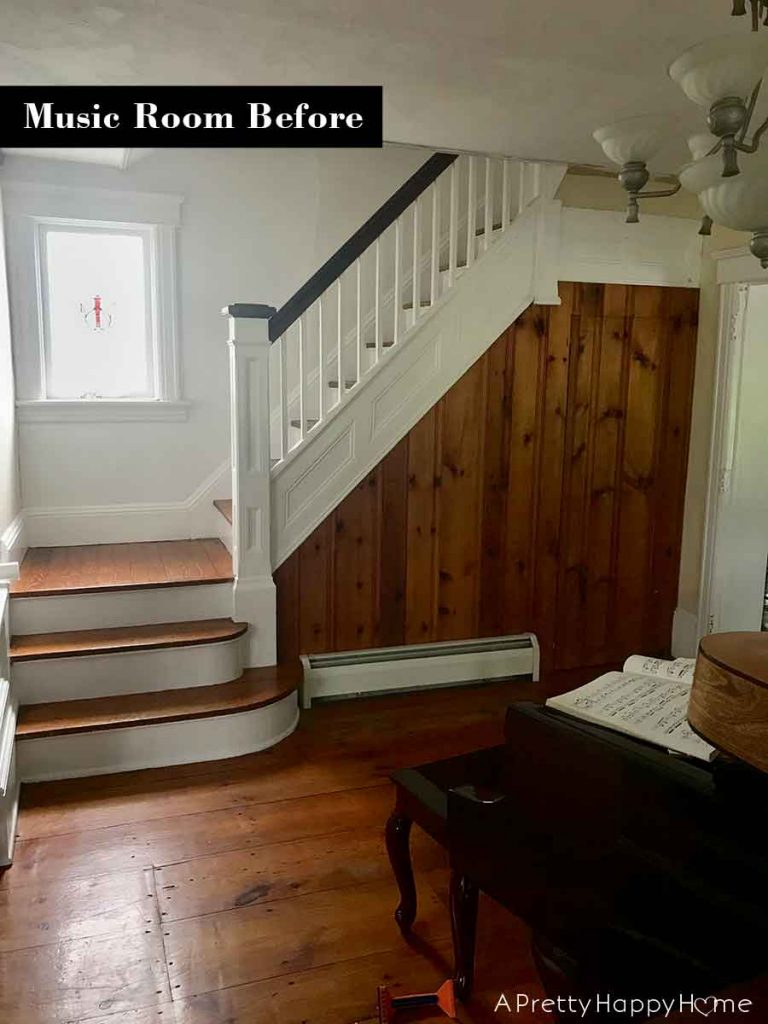
These were the main stairs on the day we moved into this Colonial Farmhouse.
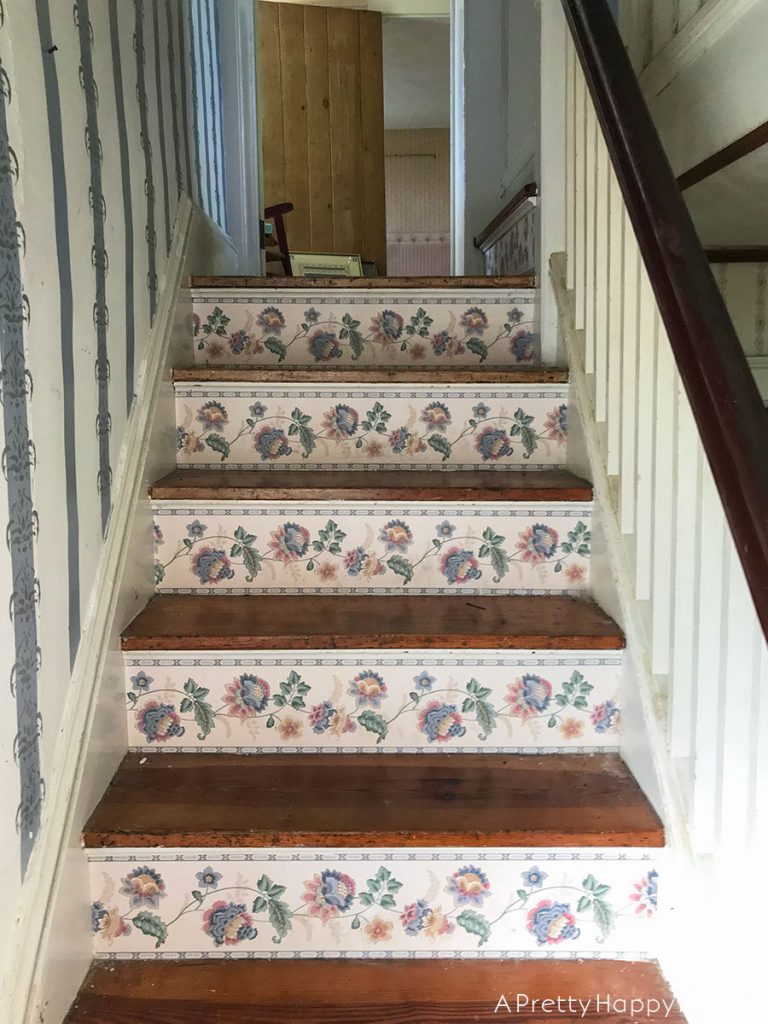
Phew!
That was a lot to take in, wasn’t it?
Let me zoom out a little so you can feast your eyes on the whole kit and kaboodle.
You can see why I wanted to buy this house, right?
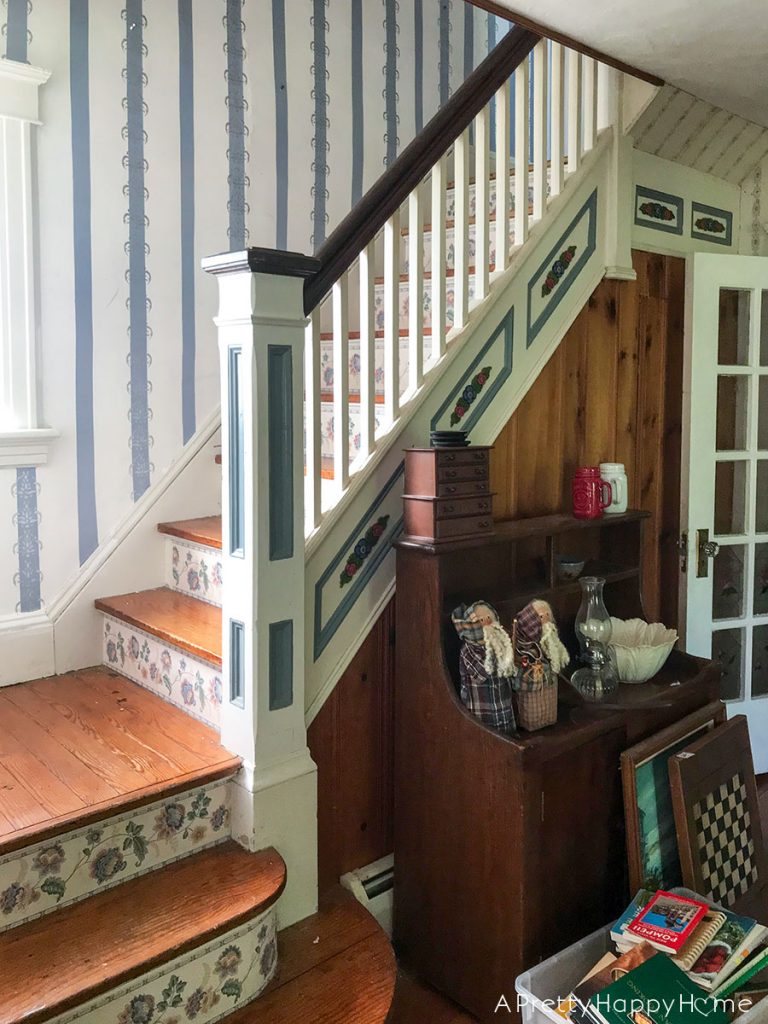
That last picture requires some explanation, so here goes.
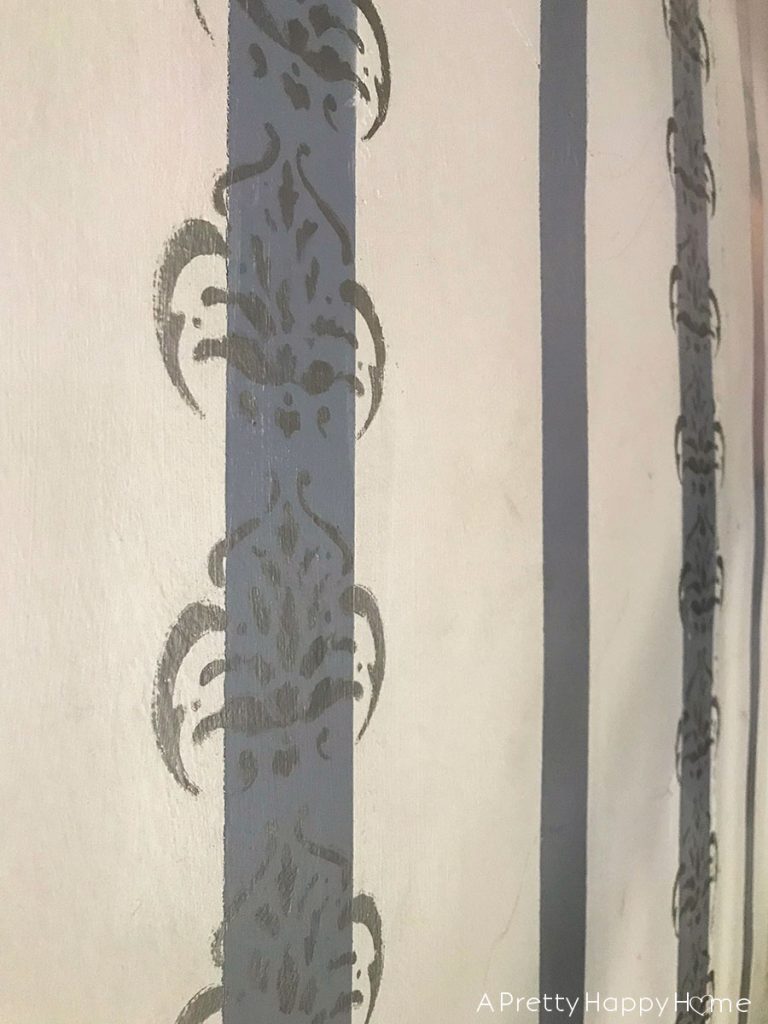
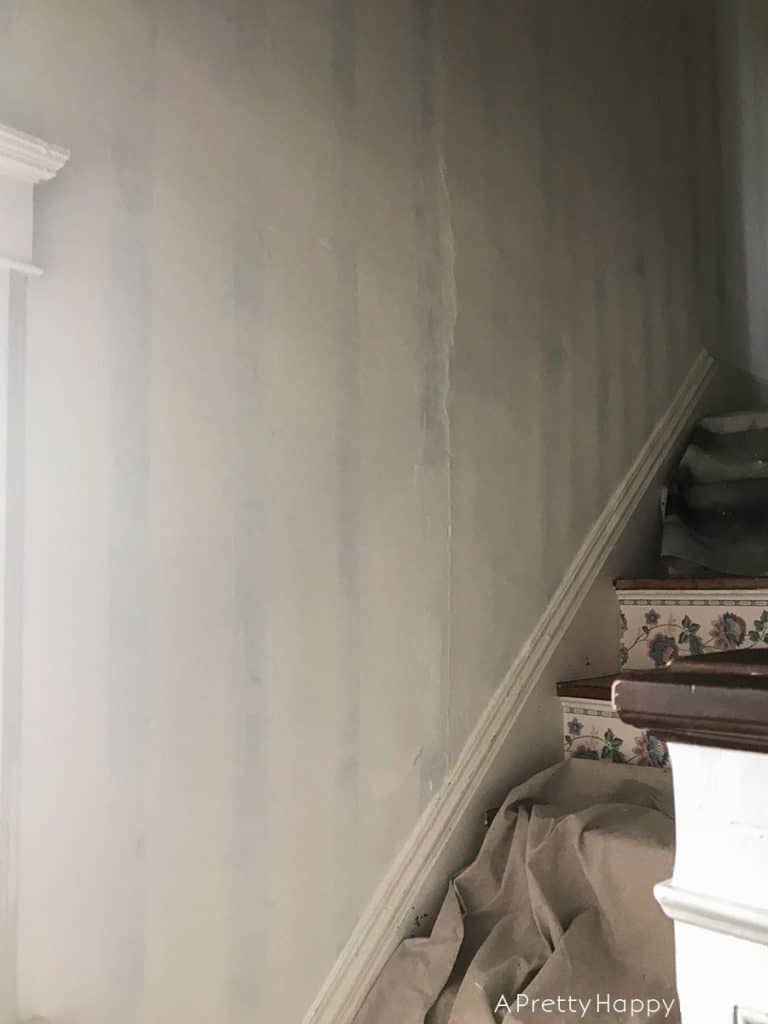
The vertical stripes on the stairwell wall were painted with denim blue-colored paint. On top of the stripes, metallic silver paint was used for the stenciled detail. The stripes had to be sanded to remove all the paint ridges left by this paint treatment.
Just keep that little tidbit in mind the next time you stencil a wall. Your choices when you get tired of this wall treatment are to sand the wall or move.
It’s clear what the previous owner decided to do.
Oddly enough, even though sanding a wall of stripes is not super fun, it was better than removing another wall of wallpaper. The surrounding room, our current music room, was all wallpapered.
Here’s the thing about wallpaper in an old house.
You don’t know what it is hiding.
Sometimes wallpaper was added to cover up imperfections.
Sometimes wallpaper hides developing imperfections, like mold and mildew.
Sometimes wallpaper creates imperfections when it is removed.
It’s like playing Wheel of Fortune, except every time you spin the wheel there’s no fortune.
Speaking of my love for wallpaper removal, the stair risers were wallpapered.
Wall. Papered.
I’m sure I’ve seen wallpapered stairs before, but it’s nothing like experiencing wallpapered stairs in person. Trust me.
The good news is I learned that if I’m going to remove wallpaper, I’ll gladly remove it from wood stair risers over a plastered or drywalled room any day of the week. It’s far less traumatic.
Moving on to a different part of the stairs, we originally thought the painted flowers on the stair stringer were some fancy molding detail. Um, no.
They were craft store wood decals that were hand-painted and then hot glued onto the stringer. Once Handy Husband realized this, he ripped those suckers off the stairs faster than you can say roses are red.
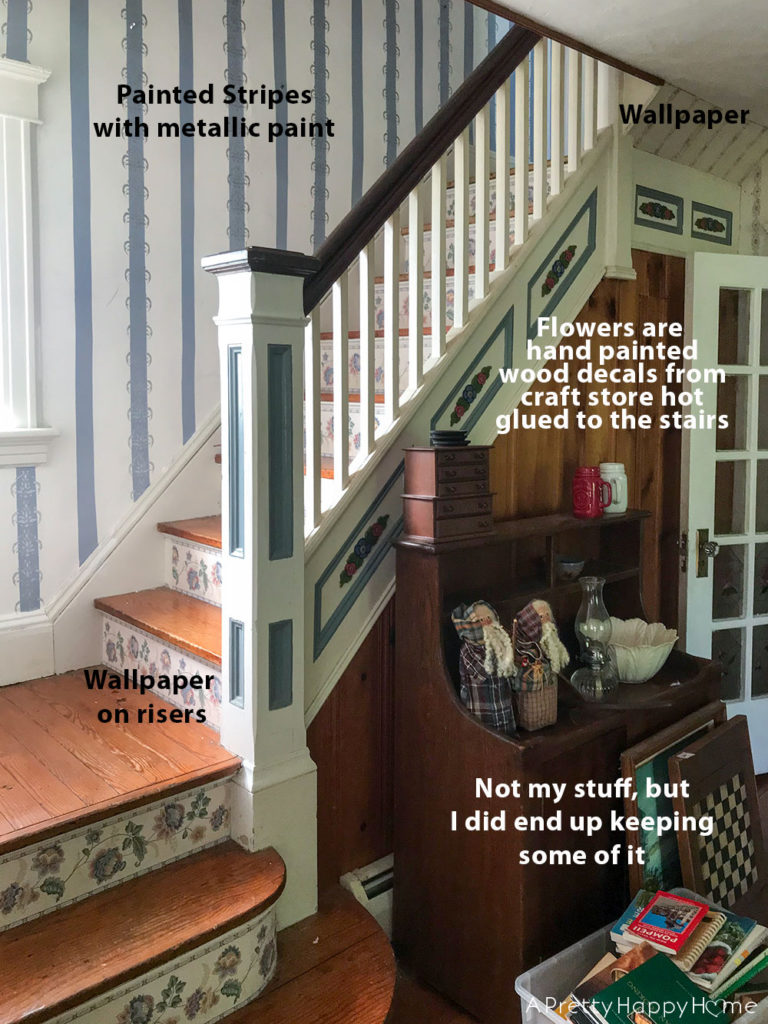
I’d also like to mention for the woodwork hawks on the blog that the paneling under the stairs was not precious centuries-old wood.
Per our estimation, it was relatively new.
It also stuck out like a sore thumb as opposed to highlighting the cool architectural features that were happening here.
So I painted it.
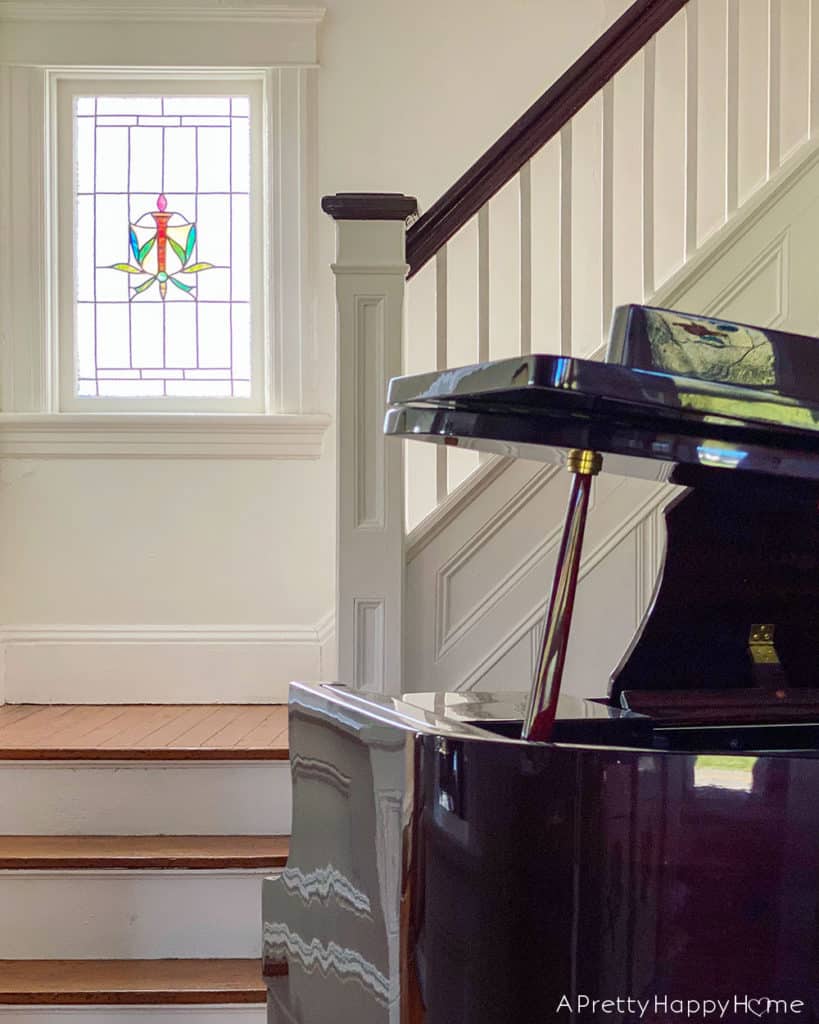
I have zero regrets about that decision because here’s how the stairs look now.
Hello, gorgeous.

Perhaps the single greatest reason to embark upon this staircase makeover was the chance to highlight the true star of the stairs, the stained glass window.
Yes, this is an actual stained glass window and it is an absolute delight to walk by this window countless times a day.
By simplifying the visual clutter surrounding this staircase, your eye now naturally goes to where it should – this gorgeous window.
It’s a shame that we as a society stopped putting stained glass windows in homes because they sure are pretty.
The only part of the staircase that I have not made over yet is the handrail and newel post cap.
This is partly because I love how the newel post cap shows some wear.
That wear reminds me that I have a physical connection to the people who lived here before me. So many of us have walked up and down these stairs carrying loads of laundry or babies on our hips. Kids have probably waited at the top of the stairs for Christmas morning to begin.
I feel such kinship with the people who lived here before we did and took care of and loved this house until it was our turn.
The other reason why I haven’t made over the handrail yet is that I think it might be tricky. Call me a chicken!
The handrail looks to me like it was painted. You can see some of the chips in the below picture. Stripping paint is not my favorite activity, so I’ll put this project off until it becomes really necessary.
Some handrails in old houses were waxed and a build-up of wax over time can make handrails sticky in this summertime. Ours does not get sticky, so I don’t think it was waxed, but I don’t exactly know all its secrets yet.

I am so happy with how this staircase makeover turned out. I truly love it.
However, the same could probably be said about the person who painted stripes on the wall and wallpapered the stairs. I think that shows how much she loved this house and that’s a beautiful thing.
Our homes are our playgrounds. We should feel free to play with paint, color, wallpaper, and decor. We should have fun decorating our homes and not worry about what other people think. Make a home that is a reflection of you and your family.
You won’t regret it.
Staircase Details and Product Sources:
Wall paint: Behr Arcade White in satin
Woodwork paint: Behr Bit of Sugar in semi-gloss
Floors and Stair Treads: Original, but probably have shellac and/or wax on them
Have you ever done a staircase makeover? How did it turn out? I’d love to hear. You can email me via the contact page of this website or reach out via Instagram or Facebook.
If you’d like to see another makeover, boy, do I have some good ones for you to check out!
Shed Makeover with Black Stain
$20 Outdoor Dining Set Makeover
*affiliate links in this blog post*


You May Also Like

Under the Stairs Closet Shelves

Colonial Farmhouse Kitchen Mini Makeover One Year Later
